kevin s's blog

Post pictures and stories about your cars both present and past. Also post up "blogs" on your restoration projects - the more pictures the better! Note: blog-type threads often get few replies, but are often read by many members, and provide interest and motivation to other enthusiasts so don't be disappointed if you don't get many replies.
Post Reply
Message
Author
kstrutt1
Posts: 516
Joined: Sat Oct 22, 2011 8:55 pm
Location: essex

Re: kevin s's blog

#51 Post by kstrutt1 »

I have also done a little on the minor, we removed the A post rear face to enable the rusty flange to be replaced and any surface rust in the seams to be removed, It has been repaired and is now ready to go back on so this area will soon be finished.
PICT0030 (Small).JPG
PICT0030 (Small).JPG (54.34 KiB) Viewed 2956 times
PICT0032 (Small).JPG
PICT0032 (Small).JPG (51.48 KiB) Viewed 2956 times
I also go a needle de-scaler for my birthday, does not get back to bare metal but certainly cleans all the deeper rust and underseal off as the picture of the wheelhouse shows.
PICT0050 (Small).JPG
PICT0050 (Small).JPG (70.51 KiB) Viewed 2956 times
PICT0048 (Small).JPG
PICT0048 (Small).JPG (69.02 KiB) Viewed 2956 times
We also have bought some MG midget rostyle wheels for it, 50 pounds with 4 newish tyres, this will enable us to move it around easier and even get it MOT'd eventually, we would really like the repro van rims now available which take tubeless tyres but at well over £200 a set they will have to wait.
kstrutt1
Posts: 516
Joined: Sat Oct 22, 2011 8:55 pm
Location: essex

Re: kevin s's blog

#52 Post by kstrutt1 »

Finaly I started filling the repairs at the rear, the deper parts where the lead had come out were filled with the fibre filler and a thin coat spread over the welds, being non porus this makes sure any porosity is completely sealed, plan is to get the rear filled and a coat of etch primer on to seal it.
PICT0049 (Small).JPG
PICT0049 (Small).JPG (51.08 KiB) Viewed 2956 times
kstrutt1
Posts: 516
Joined: Sat Oct 22, 2011 8:55 pm
Location: essex

Re: kevin s's blog

#53 Post by kstrutt1 »

Just come in from outside, landie brakes adjusted and TR clutch bleed( some air re appeared after standing for a week), also looked at the leaking water pump on the lotus, it is leaking between the water pump and front cover, so I have ordered some new o rings.
Also done some more welding on the Morris, cleaned up the welds on the gutters and primed, them.
IMG_1316 (Small).JPG
IMG_1316 (Small).JPG (60.34 KiB) Viewed 2917 times
Then made a new section for the base of the B pillar and welded this in and painted the area which will be covered by the lower rear wing.
IMG_1315 (Small).JPG
IMG_1315 (Small).JPG (49.04 KiB) Viewed 2917 times
IMG_1312 (Small).JPG
IMG_1312 (Small).JPG (59.67 KiB) Viewed 2917 times


I also had to modify the door frame to give better clearance to the roof, I cut 4 mm out of the divider bar and pulled the frame down to meet and welded it together, we now have great door to roof fit.
IMG_1313 (Small).JPG
IMG_1313 (Small).JPG (47.19 KiB) Viewed 2917 times
.
kstrutt1
Posts: 516
Joined: Sat Oct 22, 2011 8:55 pm
Location: essex

Re: kevin s's blog

#54 Post by kstrutt1 »

I have also pulled the water pump out of the elan, the original pump is part of the front cover and a major task to change, a couple of years a go I machined a removable cartridge type, this is done by machining the centre of the original pump out then machining up a new core.

The core came out easily enough with the radiator in place (just 7 bolts in total), the source of the leak then became obvious, the o ring which seals the core to the cover had been trapped and cut, the reason for this is there is quite a sharp edge on the cover, I will remove this with some emery paper and put it back together with a new O ring, the pictures are of the cartridge / core with a new O ring fitted (the one near the flange), the damaged O ring and a picture of the front of the engine (looking through a small gap from underneath)
IMG_1309 (Small).JPG
IMG_1309 (Small).JPG (54.32 KiB) Viewed 2917 times
IMG_1310 (Small).JPG
IMG_1310 (Small).JPG (65.26 KiB) Viewed 2917 times
IMG_1311 (Small).JPG
IMG_1311 (Small).JPG (29.02 KiB) Viewed 2917 times
kstrutt1
Posts: 516
Joined: Sat Oct 22, 2011 8:55 pm
Location: essex

Re: kevin s's blog

#55 Post by kstrutt1 »

A update on progress, the water pump module is back in the Lotus, I sued a 3mm diameter O ring rather than the original 4, hopefully this will not get cut like the old one, have not had chance to fill with coolant yet so fingers crossed.
The Landie has been use most days for work, I fitted the heater coolant pump which has improved the heater but not by as much as I would like, the next step is to make a recirc duct / flap which will enable air to be drawn through the footwell on the pasenger side, otherwise beyond a light bulb falling and a can of oil leaking over the rear out not much else to worry about about.
As for the minor, we have been pushing on, all the metal work on the rh side/rear is finished and we are about to put some primer on it to protect the metal while we get stuck into the front end and LH side. I have also made a bootlid, using a fiberglass skin and the old frame bonded together with PU adhesive, we also tried one of the "new" rostyle wheels on.
In the next few days we plan to turn it round and try to get the engine running and then push on with the rest of the body repairs.
Attachments
IMG_1331 (Small).JPG
IMG_1331 (Small).JPG (66.05 KiB) Viewed 2889 times
IMG_1334 (Small).JPG
IMG_1334 (Small).JPG (56.82 KiB) Viewed 2889 times
IMG_1330 (Small).JPG
IMG_1330 (Small).JPG (52.72 KiB) Viewed 2889 times
IMG_1333 (Small).JPG
IMG_1333 (Small).JPG (59.13 KiB) Viewed 2889 times
kstrutt1
Posts: 516
Joined: Sat Oct 22, 2011 8:55 pm
Location: essex

Re: kevin s's blog

#56 Post by kstrutt1 »

Betore xmas we rollered a coat of etch primer over the bare metal on the minor,

Filled the lotus with coolant today, no apparant leaks ( after I closed the drain tap). Then I got the minor ready to turn round, freed off all the brakes, cleaned up and primered the front rh wheelhouse and then tidied up a bit
Next I will spin it round, push it onto the ramp and try to get the tr in into it's space in the corner of the garage, I want to clean up the underside of the minor and try to get the engine running while it is on the ramp.
kstrutt1
Posts: 516
Joined: Sat Oct 22, 2011 8:55 pm
Location: essex

Re: kevin s's blog

#57 Post by kstrutt1 »

Over xmas I have been working on all the cars, the lotus no longer seems to be leaking so hopefully this is fixed.

The landrover has had a check over and I knoked out the blanking plate where the left hand drive clutch pedal would go, through here I have routed the heater intake to give me re-circulation for the cold weather, I also fitted the proper connector to the brake fluid level sensor I added a year or two ago.

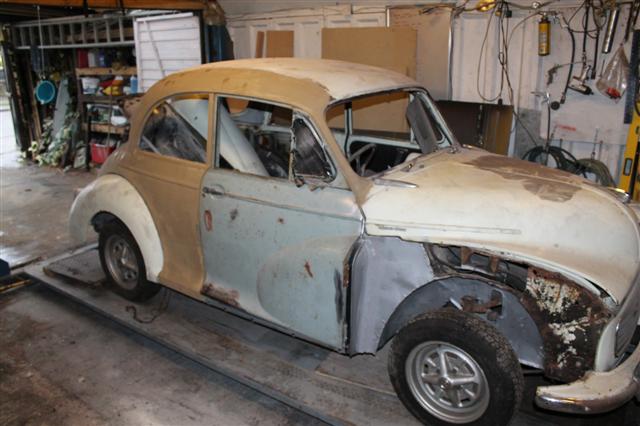
The bulk of the time has been spent on the minor, we swapped it onto the ramp and pushed the TR into it's corner I managed to break the end cap on the bumper in the process so I need to find one of these as well now.
IMG_1345 (Small).JPG
IMG_1345 (Small).JPG (68.45 KiB) Viewed 2843 times
IMG_1353 (Small).JPG
IMG_1353 (Small).JPG (59.66 KiB) Viewed 2843 times
We then decided to look at why the engine would not run, Andrew pulled the head off to releal this:
IMG_1354 (Small).JPG
IMG_1354 (Small).JPG (75.98 KiB) Viewed 2841 times
The valve was so badly corroded in the guide that it came out the head with the valve, we also found it was a 948 engine and not the correct 1098, so while it could be easily repaired we really want to find a 1098 as the starting point, so we loosely put it back together and gave up on the engine for now.

We then pulled the front panel off , the rear part is rusty but will be easily replaced, we also found that the front RH corner has been crashed leaving some distorted panels and pretty poor repairs, so rather than repair the inner wing and the bridging plate between the siderail and wheelhouse will need to be be replaced. The chassi legs are also rusted and have been plated around the control arm fixing eye, I have decided the replacements will be made from 3mm wall thickness square tube.
Attachments
IMG_1360 (Small).JPG
IMG_1360 (Small).JPG (75.24 KiB) Viewed 2840 times
kstrutt1
Posts: 516
Joined: Sat Oct 22, 2011 8:55 pm
Location: essex

Re: kevin s's blog

#58 Post by kstrutt1 »

IMG_1359 (Small).JPG
IMG_1359 (Small).JPG (78.23 KiB) Viewed 2840 times
IMG_1357 (Small).JPG
IMG_1357 (Small).JPG (65.42 KiB) Viewed 2840 times
IMG_1358 (Small).JPG
IMG_1358 (Small).JPG (66.55 KiB) Viewed 2840 times
IMG_1362 (Small).JPG
IMG_1362 (Small).JPG (64.71 KiB) Viewed 2840 times
Some pictures of the front end, plenty of oppurtunities to practise welding here, I also cut the remains of the inner wing off (after the accident repair they had only used a few tacks to hold it on anyway)
kstrutt1
Posts: 516
Joined: Sat Oct 22, 2011 8:55 pm
Location: essex

Re: kevin s's blog

#59 Post by kstrutt1 »

the reason for getting it on th ramp was so we could work on the underside, the Cross member end where the torsion bar was attached was non existent on the rhs and the whole floor needed cleaning up prior to paint.
Attachments
IMG_1347 (Small).JPG
IMG_1347 (Small).JPG (78.86 KiB) Viewed 2838 times
IMG_1351 (Small).JPG
IMG_1351 (Small).JPG (73.89 KiB) Viewed 2838 times
IMG_1348 (Small).JPG
IMG_1348 (Small).JPG (70.32 KiB) Viewed 2838 times
IMG_1349 (Small).JPG
IMG_1349 (Small).JPG (71.38 KiB) Viewed 2838 times
kstrutt1
Posts: 516
Joined: Sat Oct 22, 2011 8:55 pm
Location: essex

Re: kevin s's blog

#60 Post by kstrutt1 »

then we cleaned it all up using a scraper, followed by a wire brush on the angle grinder and a wipe over with cellulose thinner, It was then painted with a rust converter.

I also cut all the old metal off ready to weld the Crossmember on which due to the thick metal and mumber of spot welds was very time consuming.
Attachments
IMG_1365 (Small).JPG
IMG_1365 (Small).JPG (74.14 KiB) Viewed 2838 times
IMG_1363 (Small).JPG
IMG_1363 (Small).JPG (69.66 KiB) Viewed 2838 times
IMG_1364 (Small).JPG
IMG_1364 (Small).JPG (78.65 KiB) Viewed 2838 times
IMG_1366 (Small).JPG
IMG_1366 (Small).JPG (71.28 KiB) Viewed 2838 times
Post Reply