Page 5 of 20
Re: In the workshop at present
Posted: Wed Jan 04, 2017 4:47 pm
by JPB
Ah! I should have thought of doing it your way as it makes far more sense to correct the fit by rectifying the panel that was wrong to start with, and if the door were built up, then any future door replacement work would be complicated.
BL - according to a local bloke who specialises in rebuilding Stags, Dolomites, many other Triumphs and anything foreign and weird - used to use 2mm welding rods to build up the doors on Stags and Dolomites, which of course explains why doors from one car rarely fit straight onto another shell.
Chris, you would have been worshipped as some sort of supreme being if you'd been around when the assembly methods were being drawn up for the Canley plant back in the olden days. All it would have needed was for someone with common sense to say to the fettling technician on the line "Hang on, would it not make more sense to add the metal to the shell?" Very roughly, that would have added far less to the shell process than it would have saved on the ease of the door hanging, both in time and money..
Anyone seen my TARDIS? I have a cunning plan..
Re: In the workshop at present
Posted: Thu Jan 05, 2017 6:59 am
by Grumpy Northener
So to the last of the welding
- 20170103_180100-001.jpg (55.58 KiB) Viewed 4295 times

- 20170103_180055_001-001.jpg (38.98 KiB) Viewed 4295 times
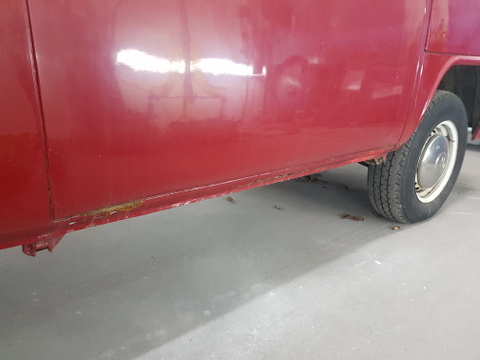
The offside sill was dead even though this had been replaced in a previous round of repairs - typically no rust protection had been applied to the inside of replacement panel and more to the point the drain flanges had been over welded /filled with bodge so the panel just rusted trough from the inside - out - the lower edge of the forward section of the rear arch on this side was also dead
- 20170104_163416.jpg (65.54 KiB) Viewed 4295 times
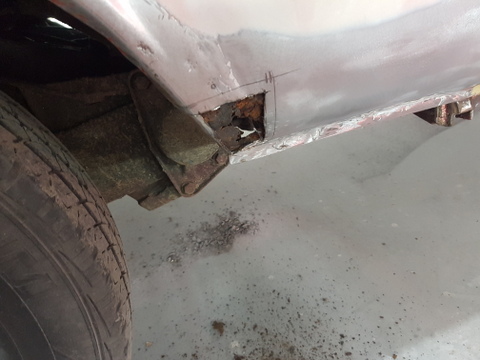
Again like most of the previous repairs undertaken several years ago on this van they had just plated straight over rust perforated metal and again this had rotted out from the inside rather than the outside
- 20170104_202333.jpg (67.28 KiB) Viewed 4295 times
- I had to remove the wheel and replate a patch repair to the inner wheelarch and as I undertook this I noticed lumps of underseal disguised filler make a bid for freedom from the rearmost section of the inner sill so a couple of panels were made up and welded in to sort that problem - right I can now get on with the paint prep - I say this slightly hesitantly as there are acres of it

Re: In the workshop at present
Posted: Sat Jan 21, 2017 4:40 pm
by Grumpy Northener
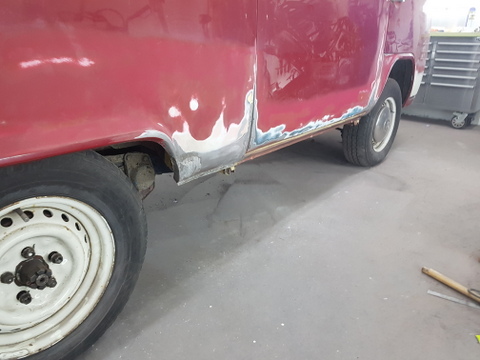
So after much filler skimming, preparation, acres of sanding / flatting back the grot box on wheels is now at this stage, many delays have been encounted due to finding so much previous bodge - the rear corners of the roof were dead and what appeared to be sound paintwork on much of the vehicle simply wasn't - loads of work has been undertaken on the window apertures which were all effected with rust perforated metal - so now it is ready to be sprayed with a polyester spraying filler which will be blocked / flatted back prior to paint - onwards
Re: In the workshop at present
Posted: Sat Jan 21, 2017 8:49 pm
by arceye
Lovely Job

Re: In the workshop at present
Posted: Mon Jan 23, 2017 8:17 pm
by Grumpy Northener
High build polyester spaying filler & guide coat on - ready for the big flat / block back tomorrow and all being well the off white colour coats to the upper half of the body on Wednesday
Re: In the workshop at present
Posted: Sat Jan 28, 2017 10:13 pm
by Grumpy Northener
Off white to the upper body painted and the maroon to the lower section apertures & inner door frames
Re: In the workshop at present
Posted: Sun Jan 29, 2017 8:00 pm
by Grumpy Northener
Doors rehung, lower half painted, demasked & ready for fitting back up with the windows & trim prior to a final polish up
Re: In the workshop at present
Posted: Mon Jan 30, 2017 6:26 pm
by TerryG
You've been busy! have you painted it with 2 pack or celly? I love a car you can see your face in the paint the shine is so deep

Re: In the workshop at present
Posted: Mon Jan 30, 2017 6:55 pm
by megadethmaniac
I recognise this van, seen it in a mag somewhere.... cant think where
Re: In the workshop at present
Posted: Tue Jan 31, 2017 8:11 am
by Grumpy Northener
You've been busy! have you painted it with 2 pack or celly?
Terry - Not that I like using it but it's 2 pack - this the 4th aftermarket paint job that it's had so that's 4 layers of paint to go over when including the factory finish - taking into account all the repair areas - had I painted this in celly it would have resulted in all the new paint shrinking around the repairs - on top of this the previous paint job had been done in 2 pack so celly over the top of this would resulted in all manner of paint reactions - the 2 pack finish in the images is straight from the gun - there is some minor peel showing but I did ladle the paint on to this one - it will polish up fine - the only way I could have got a decent celly paint finish on this camper would have been to bare metal it !