no arguement from me, i was just thinking of the daftest car to turn in to a sleeper. maybe one of those red and yellow plastic toy cars from the early learning ctr would be more apt (it probably has better crash protection than a g-wizz anyway)JPB wrote:I prefer the idea of burning one and parking in the puddle left by it.
V6 into a RHD Chrysler Neon mk1
Re: V6 into a RHD Chrysler Neon mk1
Understeer: when you hit the wall with the front of the car.
Oversteer: when you hit the wall with the back of the car.
Horsepower: how fast you hit the wall.
Torque: how far you take the wall with you.
Oversteer: when you hit the wall with the back of the car.
Horsepower: how fast you hit the wall.
Torque: how far you take the wall with you.

Re: V6 into a RHD Chrysler Neon mk1
Dad came home a little exhausted to do any welding.
This will work to my advantage, as I have time to degrease the
transmission's oil pan, and drill a hole. Dad will weld a nut there.
So it too will have an oil drain plug, so I don't get too covered
in oil again when I do another oil and filter change next year.
Rather than call into the parts store and spend time trying to
find the right size/length oil filter, I bought one on line. I have
bottles of fresh engine oil to go in, but not sure where dad has
moved the can!
I have removed both engine and transmission oil pans.
But to gain access to 2 of the bolts holding the engine oil pan,
I had to remove a bottom cover first. This cover was for the
flywheel!

A good length on the oil strainer

Now for a few measurements.
The engine oil pan is about 2.5 inches deep at the sides but
deeper in the middle.

The oil strainer pipe is about an inch in from the edge of the
oil pan judging by the bottom of the engine.

And the oil pan.

I Have removed most of the oil from the oil pans and awaiting a
final degrease with white spirits before welding and painting.

This will work to my advantage, as I have time to degrease the
transmission's oil pan, and drill a hole. Dad will weld a nut there.
So it too will have an oil drain plug, so I don't get too covered
in oil again when I do another oil and filter change next year.
Rather than call into the parts store and spend time trying to
find the right size/length oil filter, I bought one on line. I have
bottles of fresh engine oil to go in, but not sure where dad has
moved the can!
I have removed both engine and transmission oil pans.
But to gain access to 2 of the bolts holding the engine oil pan,
I had to remove a bottom cover first. This cover was for the
flywheel!
A good length on the oil strainer
Now for a few measurements.
The engine oil pan is about 2.5 inches deep at the sides but
deeper in the middle.
The oil strainer pipe is about an inch in from the edge of the
oil pan judging by the bottom of the engine.
And the oil pan.
I Have removed most of the oil from the oil pans and awaiting a
final degrease with white spirits before welding and painting.
I'm Diabetic,& disabled BUT!! NOT DEAD YET!!
Re: V6 into a RHD Chrysler Neon mk1
After mother drove me upto Gateshead to drop off
the right (long) drive shafts to be make a custom
one that will go on the car. Please remember that
the inner will be voyager and the outer will be neon.
Looking under the car without the cooler plate and
it's hoses, and the long oil filter. looks like loads of
space to work with.


Using white spirits put on with an old paint brush &
wiped it off I degreased the oil pans and oil cooler.


Anybody in the UK want to buy this off me for a few quid plus postage?


Dad did some welding for me today!
Some things just need trimming and tidying up,
others a redo and coming from a different angle.
The Rear Engine and Transmission mount.
Which only needs trimming and tidying up.
And drilling for the bolts.

The battery tray needed a rethink!
The picture below shows box tubing across the front
which would have been used to anker the strap used
to strap the battery down.
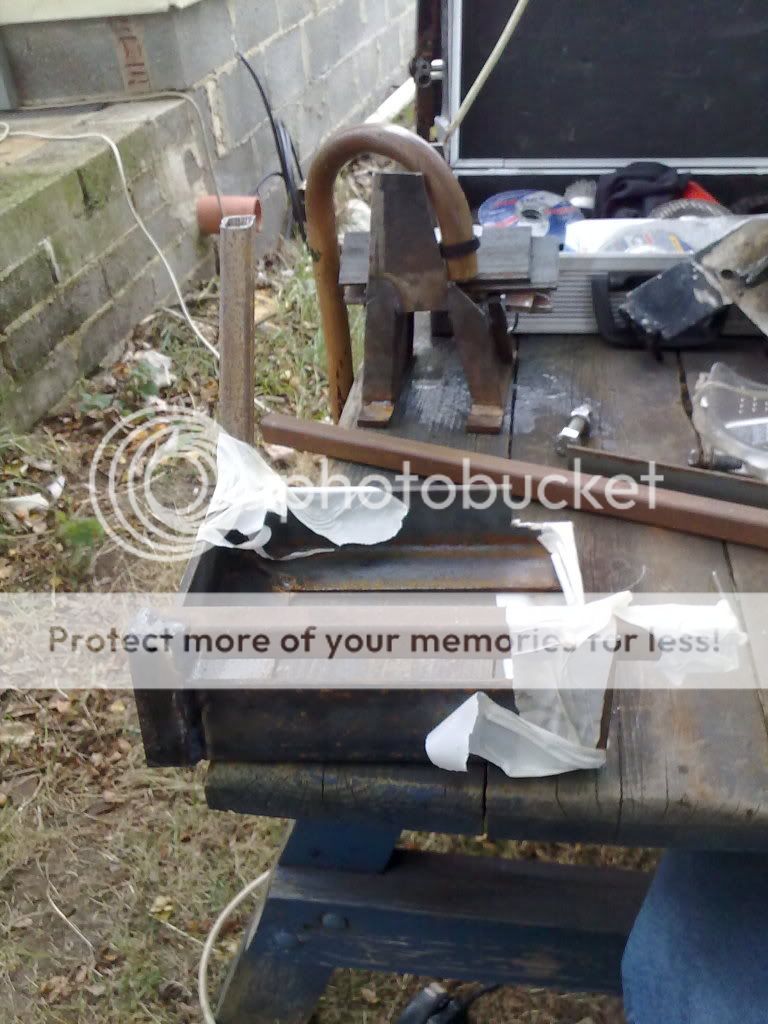
The box tubing has had to be removed as it has one big
draw back!! It actually stopped the battery being put in
the tray. This is why it needed a bit of a rethink.
After removing the box tubing, and grinding flat the area,
I have decided to use some thick plate infront of the base.
There is no bit cut yet for a bolt/fixing hole.
I have been contemplating where to fix it too. I could either
bolt it out above the washer bottle which would be a chew if
I had to remove the battery tray for any reason.
The alternative would be to bolt through the back of the
headlight surround/structure. Which may mean I would need
to remove the headlight it's self.
As the part has not been welded yet there is time to think on it.


Out comes the drill with wire brush attachments tomorrow.
The engine oil pan and the flywheel cover will be cleaned &
painted. I will also start on the rear engine&transmission
mount.
The following parts have been bought and paid for but are in
the post to me.
Engine Oil Pan Gasket
Engine Oil Pan Drain Plug (x2)
Engine Oil Filter
Rubber Vacuum Caps
the right (long) drive shafts to be make a custom
one that will go on the car. Please remember that
the inner will be voyager and the outer will be neon.
Looking under the car without the cooler plate and
it's hoses, and the long oil filter. looks like loads of
space to work with.
Using white spirits put on with an old paint brush &
wiped it off I degreased the oil pans and oil cooler.
Anybody in the UK want to buy this off me for a few quid plus postage?
Dad did some welding for me today!
Some things just need trimming and tidying up,
others a redo and coming from a different angle.
The Rear Engine and Transmission mount.
Which only needs trimming and tidying up.
And drilling for the bolts.
The battery tray needed a rethink!
The picture below shows box tubing across the front
which would have been used to anker the strap used
to strap the battery down.
The box tubing has had to be removed as it has one big
draw back!! It actually stopped the battery being put in
the tray. This is why it needed a bit of a rethink.
After removing the box tubing, and grinding flat the area,
I have decided to use some thick plate infront of the base.
There is no bit cut yet for a bolt/fixing hole.
I have been contemplating where to fix it too. I could either
bolt it out above the washer bottle which would be a chew if
I had to remove the battery tray for any reason.
The alternative would be to bolt through the back of the
headlight surround/structure. Which may mean I would need
to remove the headlight it's self.
As the part has not been welded yet there is time to think on it.
Out comes the drill with wire brush attachments tomorrow.
The engine oil pan and the flywheel cover will be cleaned &
painted. I will also start on the rear engine&transmission
mount.
The following parts have been bought and paid for but are in
the post to me.
Engine Oil Pan Gasket
Engine Oil Pan Drain Plug (x2)
Engine Oil Filter
Rubber Vacuum Caps
I'm Diabetic,& disabled BUT!! NOT DEAD YET!!
Re: V6 into a RHD Chrysler Neon mk1
The Engine Oil Filter and Oil Pan Drain Plugs arrived this morning.
It's alot shorter than the original one that was on and is definitely
fatter!


It has done nothing but drizzle all day, and not just any old drizzle!
But that fine penitrating drizzle!! So no working out side with the
grinder, which ment longer time taken with the drill and wire brush
attachments to remove old paint and rust.

The Engine Oil Pan needed the bottom beating out a little where the
engine had been sitting on it. A bit of aggression taken out on it I
think luckily for it it was only a rubber mallet.


The Fly Wheel Gaurd was the first to get it's first coat of red hammerite.

The Engine Oil Pan was given a heavy coat of pain on the outside as I
don't know what would happen if it was in contact with hot oil.
So I kept the paint off the inside.

As the Transmission Oil Pan still needs the hole drilling and a nut welding
to create a drain plug outlet, I painted all but the rear of that oil pan.
The Oil Pans will all get a few coats of paint but the worst of the rust was
on the leading edge of the oil pans so they do need a few heavy coats of
paint.

If it is still raining thenI will give all but the Transmission Oil Pan another coat
of paint.
It's alot shorter than the original one that was on and is definitely
fatter!
It has done nothing but drizzle all day, and not just any old drizzle!
But that fine penitrating drizzle!! So no working out side with the
grinder, which ment longer time taken with the drill and wire brush
attachments to remove old paint and rust.
The Engine Oil Pan needed the bottom beating out a little where the
engine had been sitting on it. A bit of aggression taken out on it I
think
The Fly Wheel Gaurd was the first to get it's first coat of red hammerite.
The Engine Oil Pan was given a heavy coat of pain on the outside as I
don't know what would happen if it was in contact with hot oil.
So I kept the paint off the inside.
As the Transmission Oil Pan still needs the hole drilling and a nut welding
to create a drain plug outlet, I painted all but the rear of that oil pan.
The Oil Pans will all get a few coats of paint but the worst of the rust was
on the leading edge of the oil pans so they do need a few heavy coats of
paint.
If it is still raining thenI will give all but the Transmission Oil Pan another coat
of paint.
I'm Diabetic,& disabled BUT!! NOT DEAD YET!!
Re: V6 into a RHD Chrysler Neon mk1
Okay earlier in this thread I was on about spray painting, or changing
the colour of the headlight gasket.
I have purchased some liquid silver latex and will attempt to clean and
paint the rubber gaskets with it. I will post the results later, but for once
one of those junk sex toys & erotica advert emails actually comes in useful!
As it provided the latex
the colour of the headlight gasket.
I have purchased some liquid silver latex and will attempt to clean and
paint the rubber gaskets with it. I will post the results later, but for once
one of those junk sex toys & erotica advert emails actually comes in useful!
As it provided the latex

I'm Diabetic,& disabled BUT!! NOT DEAD YET!!
Re: V6 into a RHD Chrysler Neon mk1
Sorry it has been raining for the past few days, and the minute
I'm not well and unable to work out side the weather gets
better! The usual reaction with certain meds an upset stomach.
Last night while it was raining and I was OK, I made a start on
the wiring loom which came with the Engine and transmission.
In the Voyager the Transmission Control Modual is on the right
hand side of the engine bay, when it goes into the neon it will
be on the left near the fuse board and ECU.
As The fuse board was brought inside too I checked what plugs
went were. There is a group of three sockets which relate to the
engine/transmission wiring loom, but I have no idea as to the
details of plugs which had wires cut off.
I'm Diabetic,& disabled BUT!! NOT DEAD YET!!
Re: V6 into a RHD Chrysler Neon mk1
While I was well enough this evening, I took the plugs with
the cut wires off the bottom of the fuse board.
And soldered the ends ready for connection to where ever
they may go!
The smoke from soldering set my stomach off again so no
more working till it settles.

the cut wires off the bottom of the fuse board.
And soldered the ends ready for connection to where ever
they may go!
The smoke from soldering set my stomach off again so no
more working till it settles.
I'm Diabetic,& disabled BUT!! NOT DEAD YET!!
Re: V6 into a RHD Chrysler Neon mk1
The Whitby Custom Show is on the 5th of November, and if
I'm going to get there Christine has 26 days to be finished.
And MOT'd before then!
So much to do and a short time to do it in!!
I'm going to get there Christine has 26 days to be finished.
And MOT'd before then!
So much to do and a short time to do it in!!
I'm Diabetic,& disabled BUT!! NOT DEAD YET!!
-
SirTainleyBarking
- Posts: 413
- Joined: Mon Feb 14, 2011 12:41 am
- Location: Solihull, where Landrovers come from
Re: V6 into a RHD Chrysler Neon mk1
DO IT, and I'll take a picture of it!Mitsuru wrote:The Whitby Custom Show is on the 5th of November, and if
I'm going to get there Christine has 26 days to be finished.
And MOT'd before then!
So much to do and a short time to do it in!!
(Says me sat on my fat backside, breaking wind and typing on a laptop......
Landrovers and Welding go together like Bread and Butter. And in the wet they are about as structurally sound
Biting. It's like kissing except there's a winner
Biting. It's like kissing except there's a winner

Re: V6 into a RHD Chrysler Neon mk1
x2.SirTainleyBarking wrote:Says me sat on my fat backside, breaking wind and typing on a laptop......
Yes, Aron, just do it. Worry afterwards.
J
"Home is where you park it", so the saying goes. That may yet come true..
"Home is where you park it", so the saying goes. That may yet come true..